Search Knowledge Base by Keyword
What Is Horizontal Scaling And How It Works
In this guide we will review in detail what horizontal scaling is, how it works, and how to adjust the limits of your cloud environment.
With the UKHost4u Cloud Solutions Platform you can automatically scale any web application and website, both vertically and horizontally. This means when your web applications become popular and your traffic grows, your resources increase as well.
We will see in this article how to set your environment’s horizontal scaling, both manually and automatically. Here is a quick outline to help you navigate through:
- Horizontal Scaling
- Horizontal Scaling Modes
- What are the Horizontal Scaling specifics?
- How to manage Horizontal Scaling nodes within layers?
- Automatic Horizontal Scaling
- Triggers for Automatic Horizontal Scaling
- How to trigger Automatic Horizontal Scaling execution history?
Horizontal Scaling: Multi Nodes
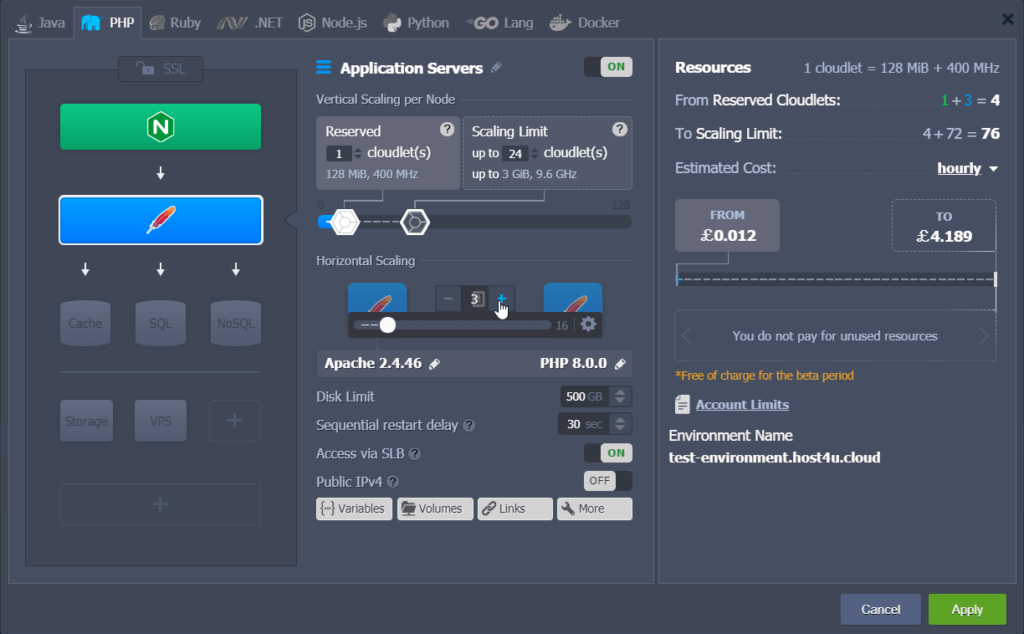
In order to manually scale your environment horizontally, simply open up your environment topology wizard and for each nodes use the “+” and “–” buttons (or the slider) to make your adjustments.
PLEASE NOTE:
- Check this section to automate horizontal scaling based on incoming load with the help of tunable triggers.
- You can use the master (initial) node of the layer as your storage server for sharing data within the whole layer.
- In case of scaling down, such as decreasing the number of nodes, the last container added to the layer is the first one to be removed unless you selected one explicitly.
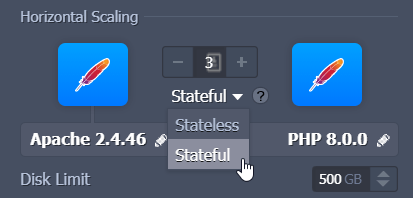
Then chose the required scaling mode directly from the drop-down list. Please refer to the horizontal scaling specifics section for additional details.
Scaling modes
When creating or editing your environment you can select your preferred scaling mode:
- Stateless: simultaneously creates all new nodes from the base image template.
- Stateful: sequentially copies the file system of the master container into the new nodes.
When selecting the stateless mode, you will find it comparatively faster, while the stateful mode automatically copies all custom configurations.
Even for the stateful mode (as there is no customisation that have been applied yet) all the nodes are created at the same time. This will speed up the process during the initial layer creation.
However, when you have chosen the stateless mode, you should keep in mind that the following features on the new nodes within the layer will be missing:
- Deployments: existing project contexts won’t be transferred
- Custom SSL: SSL certificates and configs won’t be copied
- Mount points: custom mounts points will be moved only if the appropriate volume is configured.
- Add-ons: any add-ons installed on the layer won’t be available.
PLEASE NOTE: Custom files transfers with the stateless mode can be done manually or configured via the Cloud Scripting automation.
Knowing this, we would recommend you the stateful mode for the load balancer, application server, and VPS stacks. In any case, you can always manually adjust and re-define the scaling mode for your nodes using your environment’s topology wizard.
What are the Horizontal Scaling Specifics?
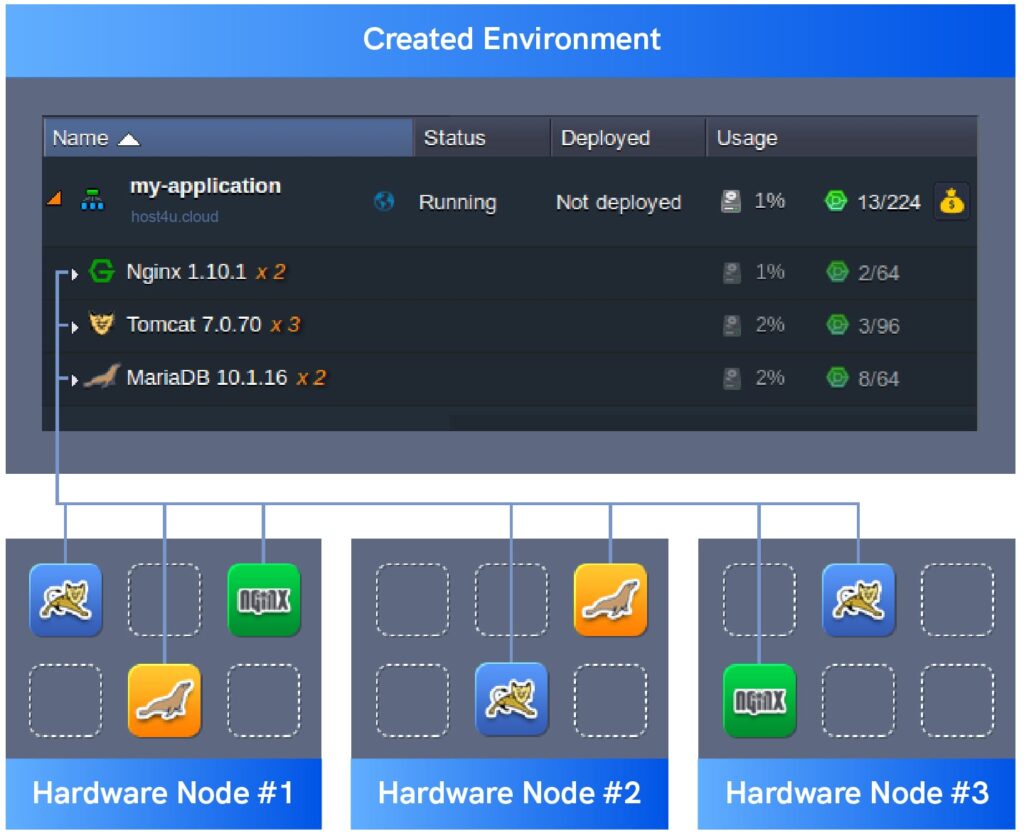
The limit for the same-type server within the same environment layer is set to 16 nodes. All newly added servers are created at different hardware nodes, providing advanced reliability and high-availability.
Each environment node group or layer is provided with a dedicated name. If necessary, you can edit your environment’s layer names manually. When adding several instances inside your environment, the layer name will be complemented with the xN label (where N corresponds to the actual node number).
Having several same-type nodes within a layer enables their synchronous management. Thus, all containers can be simultaneously configured, inspected for logs and statistics, restarted or redeployed through the corresponding icons.

In order to operate with a particular container separately, to see the full list of its nodes by clicking on the container and expand the layer’s string.
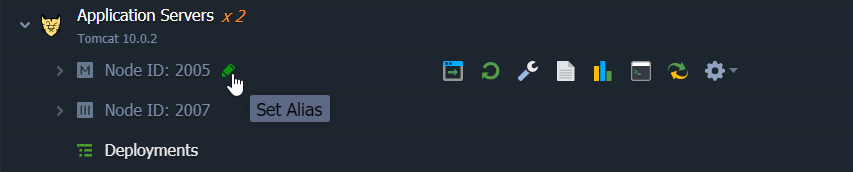
Each of these containers is an isolated instance, which has a unique Node ID and can be accessed or configured apart from the others. You can locate the Master Node easily thanks to its dedicated icon: “M”.

To ease the interactions between several servers of the same type, UKHost4u Cloud Platform allows you to mark a specific node with the appropriate label to define either the master or slave instances within a DB cluster.
- Expand the container selection
- Double-click at the default Node ID xxx or hover over the the pencil icon
- Specify the new Node’s name
Feel free to check our Environment Aliases article for more information.
PLEASE NOTE: If you are scaling different types of stacks, you should consider the following specifics:
- When scaling the application server instance, the load balancer node will be automatically added to the environment topology.
- If you enable the high-availability feature for your application server, the required NGINX load balancer cannot be scaled horizontally. If multiple NGINX nodes were available before, they will be automatically downscaled into a single instance.
- When scaling VPS nodes, each one is provided with a separate public IP address attached.
- Maven is the only node that can’t be scaled horizontally.
Now, you know how horizontal scaling works and how easy it is to horizontally scale instances with UKhost4u Cloud Solutions platform. Let’s see now, how to configure automatic node scaling and how to overcome high load spikes without paying for limits you’ll never reach.
How to manage Nodes within a layer?
UKHost4u Cloud Platform provides an easy and intuitive node management system. You can specify the required number of containers in a layer.
PLEASE NOTE: When you remove a container, the most recent containers are removed first.
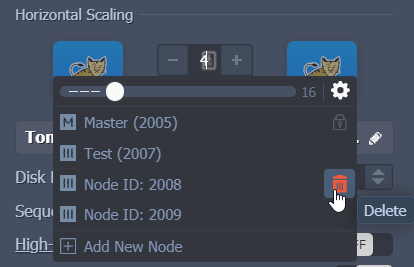
How to delete a specific node
If you need to delete a specific node, you can either:
- Access to the Horizontal Scaling section in your environment topology wizard.
- Click on the Change Environment Topology button for the required environment.
- Click on the “+” or “-” button to realize your changes.
- Click on the bin icon to delete a specific node.
- Delete the node using the dedicated Scaling Nodes option in the dashboard.
- Expand the container.
- Hover over the scaling node and click on the Additionally button.
- Click on the Delete button of the particular node.

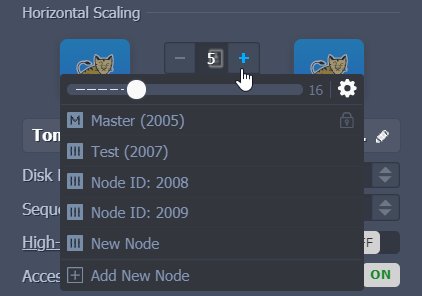
How to add or remove a node
Open the Scaling Nodes window in your environment topology wizard and:
Click on the”+” or Add New Node buttons.
PLEASE NOTE:
- If the high availability feature is enabled for the layer (for Tomcat and TomEE application servers only), the nodes will be added and removed in pairs.
- Empty containers represents stateless mode nodes and filled one for stateful.
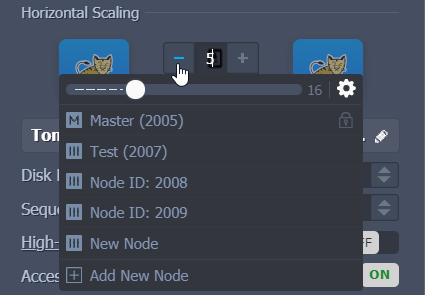
Click on the “-” or the “bin” icon (when hovering over the particular node) to remove instances.
If you want to undo the node’s removal:
- Open the Node’s settings.
- Click on the Additionally button.
- Click Delete.
- Finally click on Undo Deletion.

3. You will find the Automatic Horizontal Scaling section in your environment’s settings.
4. When you apply changes, our UKHost4u Cloud Platform will automatically notify you about all the potentially harmful actions (if any) that will be performed with your environment such as:
- Nodes restart notifications.
- Layers and separate nodes removal reminder.
- Impact on existing NFS mounts.
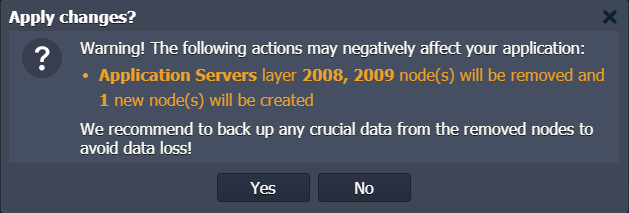
Before proceeding, safely back up your data to ensure that the listed points won’t affect your application, or any crucial data (from the removed nodes).
Automatic Horizontal Scaling
As mentioned earlier, in addition to the inbuilt automatic vertical scaling, UKHost4u Cloud Platform can automatically scale nodes horizontally. This changes the amount of containers within a layer to efficiently distribute the incoming traffic.
This means that load between all instances within the same layer are evenly distributed. To ensure reliability and high-availability of the hosted projects, a new container is created and placed at the host with the least number of instances from the same layer to the lowest load mark.
Automatic horizontal scaling is implemented with the help of “triggers”, which are, in short, custom conditions for node addition (scaling out) and node removal (scaling in) based on the present load.
To decide if the node count adjustment is required, every minute our cloud platform analyses the average consumption of the resources (the number of minutes is specified within the trigger).
PLEASE NOTE: The statistic is gathered for the whole layer. For example, if there are 3 nodes, which are loaded for 20%, 60%, and 25% respectively, then the calculated average value is 35%.
Furthermore, the scale in and out conditions are completely independent to each others. As such, the analyzed period for one is not reset when another one is executed.
Triggers for Automatic Scaling
PLEASE NOTE: When a single certified application server (except a custom Docker container) is scaled out on an environment without load balancers, the NGINX balancer will be deployed automatically. However, if you need a different load balancer for your application, then you should add it manually before scaling event.
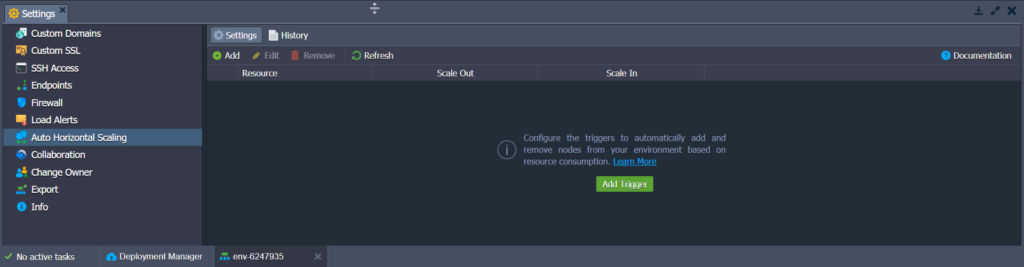
To configure a trigger for the automatic horizontal scaling:
1. Click on the Settings button for the required environment.
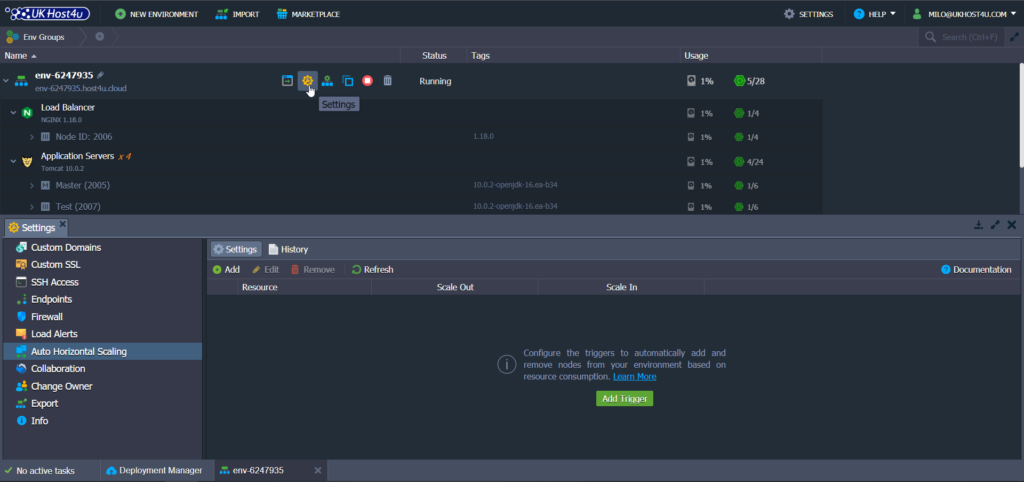
2. In the opened tab, navigate to the Auto Horizontal Scaling section (see above).
You can manage auto horizontal scaling for the environment with the following features:
- Add: to create a new trigger.
- Edit: to adjust the existing trigger.
- Remove: to delete unrequired trigger.
- Refresh: to update the displayed list of scaling triggers.
Click Add to proceed.
3. Select the required environment layer from the drop-down list and choose the resource type to monitor via one of the appropriate tabs: CPU, Memory, Network, Disk I/O, Disk IOPS.

Our advice:
- You can use the Master node as a storage server. For example, you can share data within the whole layer, including nodes added through automatic horizontal scaling. The CPU and Memory limits are calculated based on the amount of the allocated cloudlets.
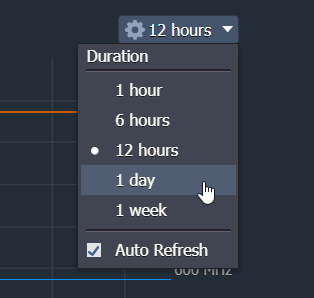
4. On the image below you can see how to visualise the consumption usage over a particular period of time. Simply, using the drop-down list, select the required period you want to display your data. You can also enable/disable the statistics’ Auto Refresh function from there.
5. For each trigger, you can “Add” and “Remove” nodes conditions. You can also enable it with the corresponding check-boxes.
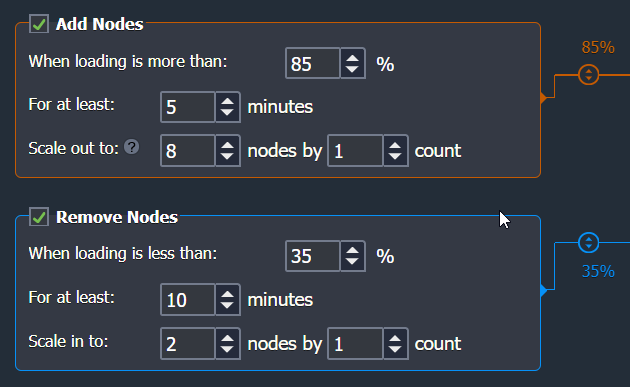
Now, let’s go through an example where both are configured the same way:
- When loading is more than the upper limit in percentage for the average load ( it executes the trigger if exceeded).
- When loading is less than the lower limit in percentage for the average load (it executes the trigger if exceeded).
PLEASE NOTE:
- Values can be stated using the sliders on the graph.
- The 100% value automatically disables the Add Nodes trigger, and 0% the Remove Nodes one.
- 20% is the minimum difference allowed between Add and Remove Nodes conditions.
- Mbps units can be selected for the Network trigger instead of the percentage.
- We recommend setting the average loading for the Add Nodes trigger above the 50% threshold to avoid unnecessary scaling such as wasted resources or funds.
- For at least: corresponds to the number of minutes the average consumption is calculated for (up to one hour with a 5 minutes step, such as . 1, 5, 10, 15, etc.).
- Scale out (in) to: is the maximum or minimum amount of nodes for the layer, that can be configured due to automatic horizontal scaling.
- Scale by: is the count of nodes that are to be added/removed at a time upon trigger’s execution
When you configure a trigger, keep in mind the layer’s scaling mode. For instance, you should set lower loading percent in the “Add Nodes” trigger for a stateful mode, as content cloning requires some time and you can reach resources limit before a new node is created.
6. Using the toggle button you can also set up automatic email notifications. If you don’t want to receive updates, simply select the “OFF” option.

7. At the bottom of the page you will find the following buttons:
- Undo Changes: which brings you back to the previous state (in editing mode only).
- Close: it exits the dialog without changes.
- Apply or Add: applies or confirms changes for the trigger.

Select the required option to finish the trigger creation or its adjustment.
How to trigger the execution history
If you need to check your scaling triggers’ history for a particular environment:
- Open up your environment’s Settings.
- Select Auto Horizontal Scaling option.
- Click on the History button to display the triggers execution history.

PLEASE NOTE: You can additionally customize the period to display triggers activity using the From and To fields.
When a trigger has been executed, you will be able to see in details its:
- Date and Time of the trigger execution.
- Action performed (Add or Remove Nodes).
- Nodes type the scaling was applied to.
- Info about the trigger execution condition.
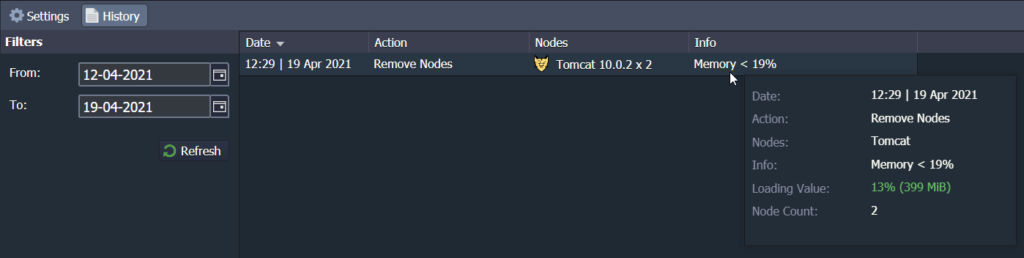
If you need extra details, hover over the particular record to check the Loading Value which will display the resource usage on the moment of execution and Node Count resulting number of nodes.
PLEASE NOTE: The Add and Remove Nodes triggers are independent to each other. If the removal condition average load is not reset then it continues to check even after a new node addition. This approach provides a quicker detection of the sufficient average load during a specified interval.
We recommend you to set a significant difference between scaling out and scaling in limits to avoid too many topology changes.
That’s it! Now you know all about manual and automatic horizontal scaling, how to configure a set of tunable triggers to ensure your application performance and track automatic horizontal scaling activity directly via the dashboard.
If you have any questions or need further assistance with your horizontal scaling, feel free to contact our 24/7 support team!
Next Steps:
- Vertical Scaling
- Import an environment
- Create an environments’ group
