Search Knowledge Base by Keyword
How DNS Works And How To Edit DNS Record In cPanel
The Domain Name System (DNS) is a crucial component of the internet that enables users to access websites using human-readable domain names rather than IP addresses. In this guide, we will explain how DNS works and how to edit DNS records in cPanel, a widely used web hosting control panel.
How DNS Works
- User query: When you enter a domain name (e.g. example.com) into your web browser, the process begins with a DNS query.
- Recursive resolver: Your computer sends the query to a recursive resolver, which is usually provided by your internet service provider (ISP) or configured manually.
- Root nameserver: The recursive resolver forwards the query to a root nameserver, which holds information about top-level domains (TLDs) such as .com, .org, etc.
- TLD nameserver: The root nameserver directs the resolver to the appropriate TLD nameserver (e.g. the .com nameserver) for the domain in question.
- Authoritative nameserver: The TLD nameserver then points the resolver to the authoritative nameserver responsible for the specific domain (e.g. example.com). This server contains the DNS records for the domain.
- DNS records: The authoritative nameserver retrieves the relevant DNS record (e.g. the A record, which contains the IP address of the web server hosting the website) and returns it to the recursive resolver.
- Resolver response: The recursive resolver sends the IP address back to your computer.
- Web server connection: Finally, your computer uses the IP address to establish a connection with the web server and request the website content.
How to Edit DNS Records in cPanel
To edit DNS records using cPanel, follow these steps:
- Log in to your cPanel account. This is usually done by accessing a URL like
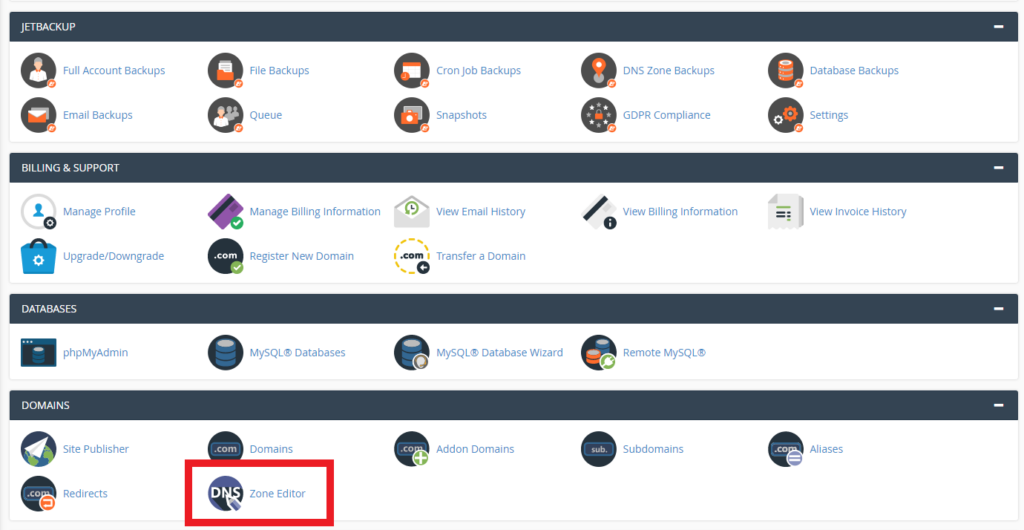
http://yourdomain.com/cpaneland entering your username and password. - In the cPanel dashboard, locate the “Domains” section and click on “Zone Editor.”
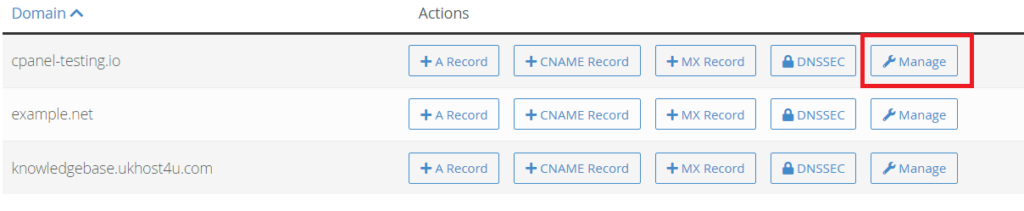
- Find the domain name for which you want to edit DNS records and click on “Manage.”
- You will see a list of existing DNS records for the domain. To edit a record, click on the “Edit” button next to it.
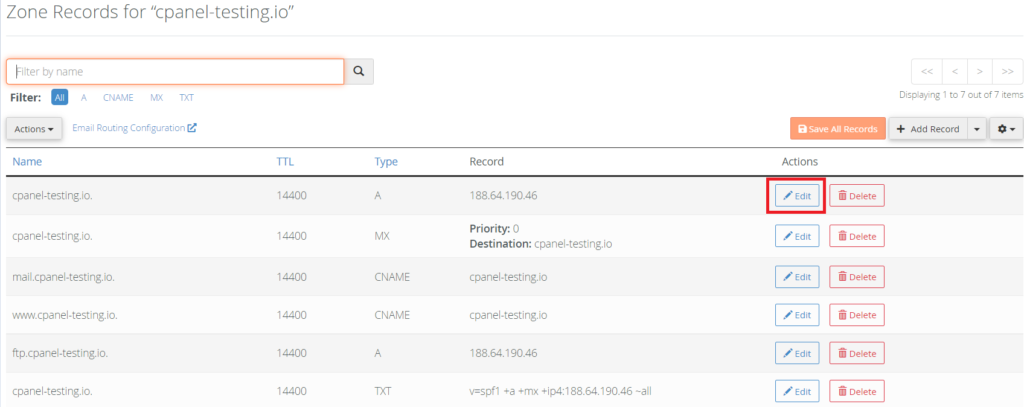

Modify the record details as needed. For example, you may want to change the IP address in an A record, or update the mail server address in an MX record.
Click “Save Record” to apply the changes. Note that it may take some time for the changes to propagate across the internet due to DNS caching.
DNS Zone Records Explained:
DNS zone records are essential for mapping human-readable domain names to specific services and IP addresses. In this section, we will discuss various types of DNS zone records and their uses.
A (Address) Record: This record maps a domain name to an IPv4 address. It is used to point a domain or subdomain to the IP address of a web server hosting the website.
AAAA (IPv6 Address) Record: Similar to an A record, an AAAA record maps a domain name to an IPv6 address. It is used when the server has an IPv6 address in addition to, or instead of, an IPv4 address.
CNAME (Canonical Name) Record: This record creates an alias for a domain or subdomain, pointing it to another domain name. It is useful for directing multiple domain names to a single server or for creating subdomains that reference the main domain.
MX (Mail Exchange) Record: An MX record specifies the mail server responsible for receiving email messages on behalf of a domain. It includes a priority value to determine the order in which mail servers should be attempted for delivery.
TXT (Text) Record: TXT records are used to store human-readable or machine-readable text information related to a domain. Common uses include verifying domain ownership for services like Google Search Console and implementing email authentication protocols such as SPF, DKIM and DMARC.
SRV (Service) Record: SRV records define the location of services provided by a domain, such as LDAP, SIP or XMPP. They include the service name, protocol, priority, weight, port and target domain.
PTR (Pointer) Record: A PTR record is used for reverse DNS lookups, mapping an IP address back to a domain name. This is often used for email servers to verify that the sending IP address is associated with the domain it claims to be from, helping to reduce spam.
NS (Name Server) Record: NS records specify the authoritative name servers responsible for a domain. These records are configured at both the registrar level and within the domain’s DNS zone file.
SOA (Start of Authority) Record: The SOA record contains essential information about the DNS zone, such as the primary name server, the responsible party’s email address, the zone’s serial number and various timing parameters. It is the first record in a DNS zone file.
CAA (Certification Authority Authorisation) Record: A CAA record allows a domain owner to specify which Certificate Authorities (CAs) are authorised to issue SSL/TLS certificates for their domain. This helps to prevent unauthorised issuance of certificates and improve security.
These are the main types of DNS zone records used to manage domains and their associated services. When configuring DNS records, ensure that they are correctly set up to avoid potential issues with your website, email or other services.
