Operating the WordPress Dashboard admin area and panel
This guide provides a clear and cohesive overview of the WordPress Dashboard and how to operate its features. It will explain how to login to the Dashboard, or admin panel as it is also commonly termed, the different screen options and the tabs that you will see on the Dashboard menu.
We will also show you how to update your profile and highlight other useful features, such as changing your website colour scheme. In order to personalise your Dashboard, this guide will also explain how to change layouts and themes to make it more conducive to your requirements.
What exactly is the WordPress Dashboard?
As one of the most user-friendly Content Management Systems, WordPress utilises the Dashboard as a simplistic way of managing your website and the information you upload onto it. It is the first thing you see on your screen after you have logged in to your website admin panel (see below for more info on this).
The Dashboard is an organised selection of different widgets and menus that, as well as managing your content, supplies you with a wealth of information about your website’s functions and performance. You can quickly navigate between different areas of your website by placing your cursor over the relevant section from within the Dashboard screen.
Essentially, the Dashboard allows you to post articles and enhance your website’s functionality by adding categories and/or plug-ins and customising themes. If you like, it is the control room of your entire website/blog. In order to access the Dashboard, you will have to log in to your website admin area.
Logging in to the WordPress admin panel
To access the login page, simply add /wp-admin or /wp-login.php to the end of your domain name, for example, *******.com/wp-admin or *******.com/wp-login.php. This will take you directly to the login page.
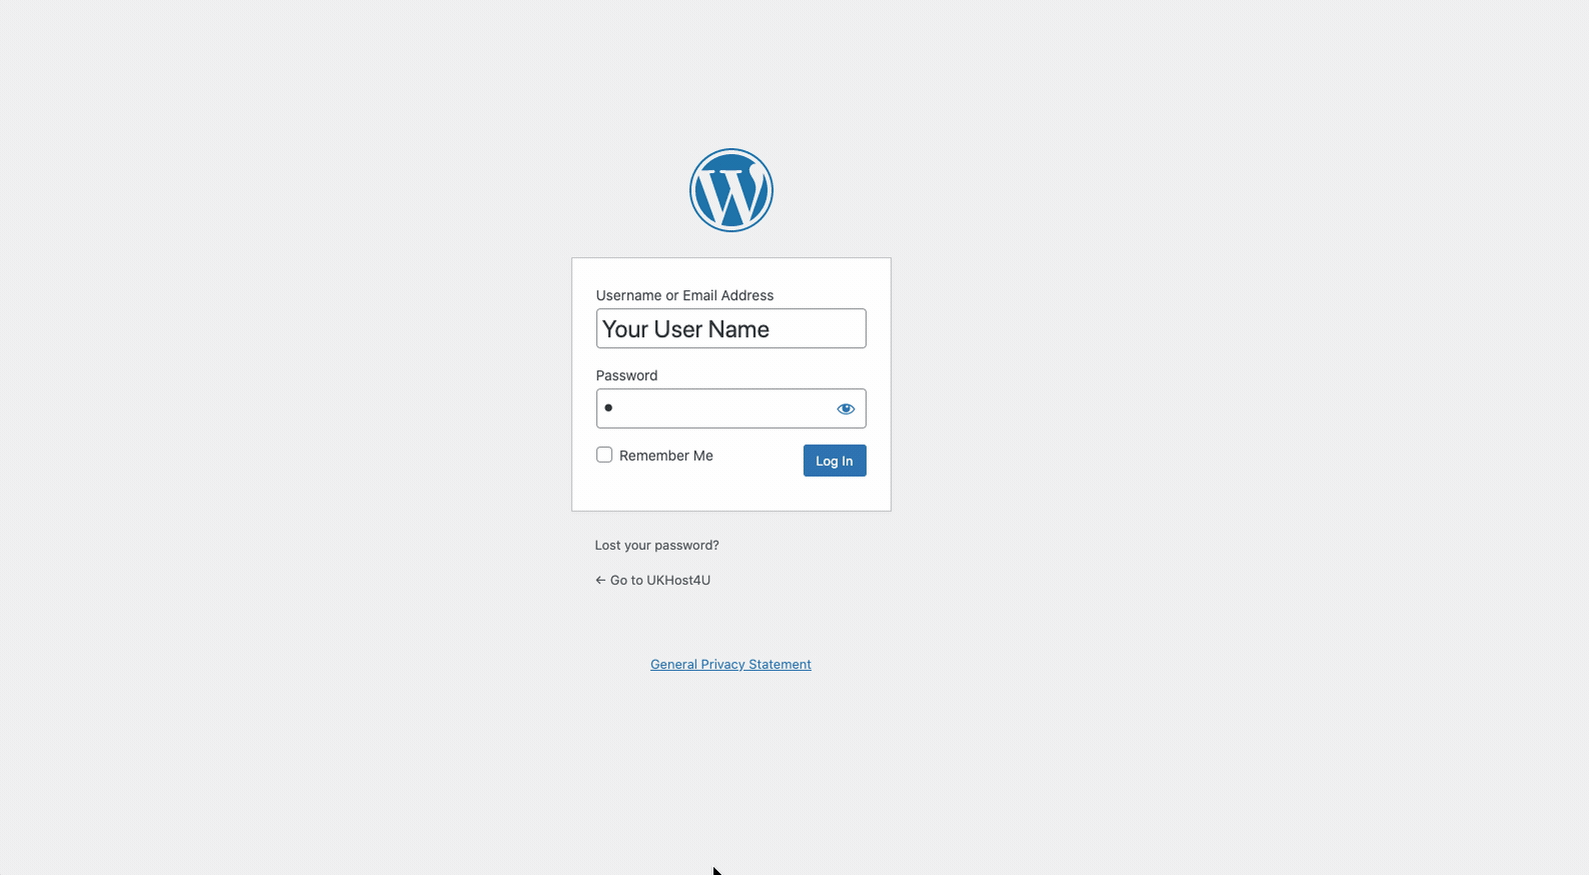
In the appropriate boxes, enter your username and the password that was created/sent to you when you installed WordPress on your website. Once you have done this, click on the login button. Having successfully logged in you will be presented with a screen containing an array of different widgets, blocks, and menus. This is your Dashboard or admin panel.
Exploring the Dashboard’s main screen
Menu
On the left-hand side of the Dashboard screen, you will see a navigation menu. It contains a number of different options; posts, media, pages, comments, appearance, plugins, users, tools and settings, and you can also add any additional features to it that you might find useful, such as SEO. Use these options to access and manage different areas of your website. The options on the menu will be explained later on in the guide.
Toolbar
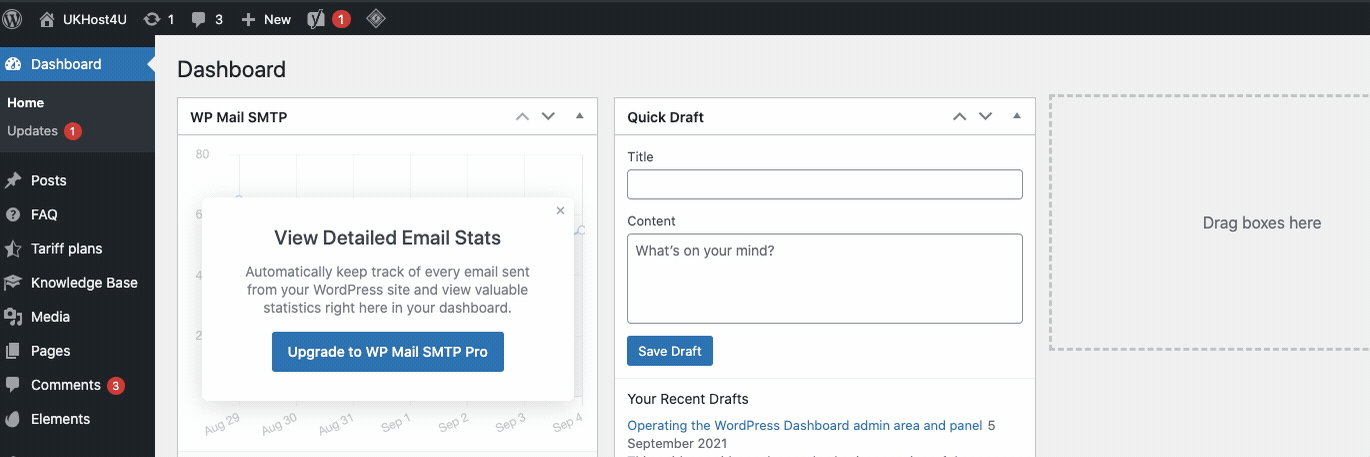
The Toolbar is situated at the very top of your Dashboard and contains quick links to a variety of functions, for example, creating a new post or page, SEO settings, post comments and more. Take the time to explore and utilise these as they provide excellent shortcuts. You will find that the contents pop up automatically as you glide your cursor over them.
Screen options
There are six widgets on the WordPress admin panel; ‘Site Health Status’, ‘At a Glance’, ‘Activity’, ‘Quick Draft’, ‘WordPress Events and News’ and ‘Welcome’.
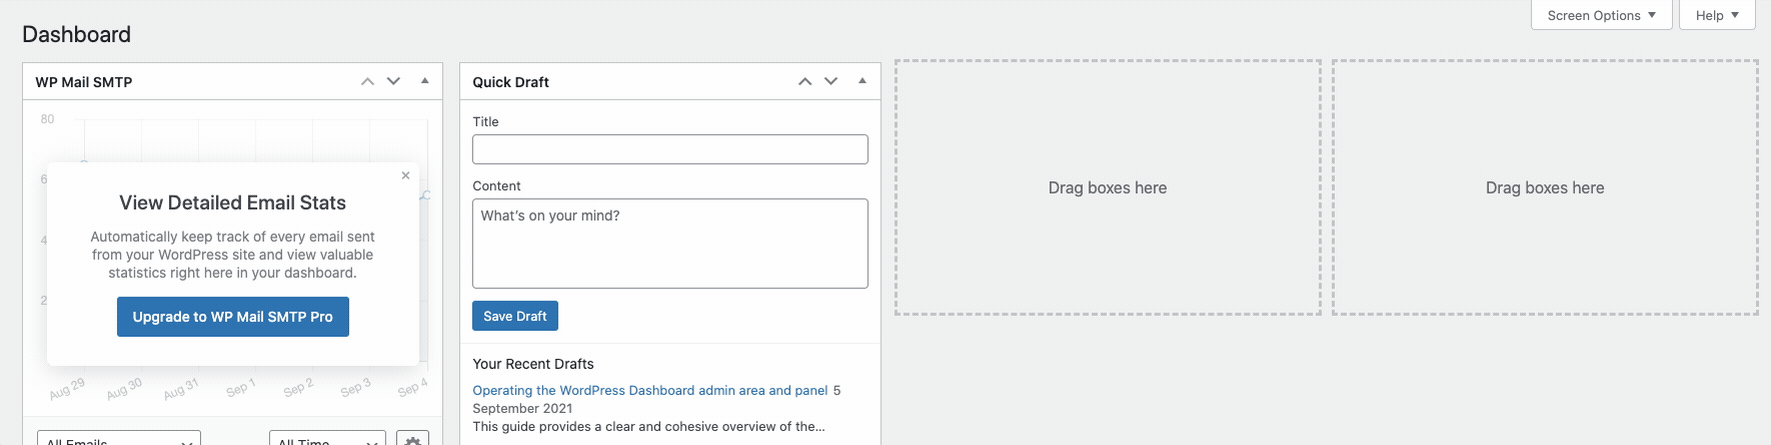 If you click on ‘Screen options’ at the top right of the screen, it will allow you to display or hide these widgets on the admin panel. You can choose which widgets you would like displayed by checking the box in front of its name in the screen options section. To hide it, just remove the check from the box.
Welcome to WordPress
This primary element of the Dashboard is comprised of three columns. The left-hand column contains a “Customise Your Site” button, which enables you to completely change your theme settings. The centre column provides links for setting up the home page, adding your first blog post and viewing the front end of your website, as well as adding additional pages. The right-hand column contains links that enable you to manage widgets and menus, links to the WordPress ‘Getting Started’ guide and settings which help you to moderate comments.
Quick Draft
The Quick Draft feature is a mini editor which enables you to create a draft version of new posts. It is very simple to operate, just enter your chosen title and the content of the post/blog/article that you would like to upload. Once you have finished, just click on the ‘Save Draft’ button and it will be saved as a draft that can be accessed later for editing from the ‘Posts’ option on the Dashboard menu, or from the ‘Quick Drafts’ widget.
Site Health Status
The purpose of this feature is to help monitor your website’s performance and security. Located under Dashboard/Tools/Site Health, it identifies problems and provides recommendations on how to fix them.
One of its functions is to run tests on the site and provide a score based on its analysis. These are accessible when you select ‘Site Health Screen’, from the Status page and info page. It will rate the site as either ‘Good’, ‘Recommended’ or ‘Critical’, ‘Good’ meaning that the site is performing well overall, ‘Recommended’ advising some areas of potential improvement and ‘Critical’ meaning that the site needs immediate attention. Read more here on Site Health for WordPress.
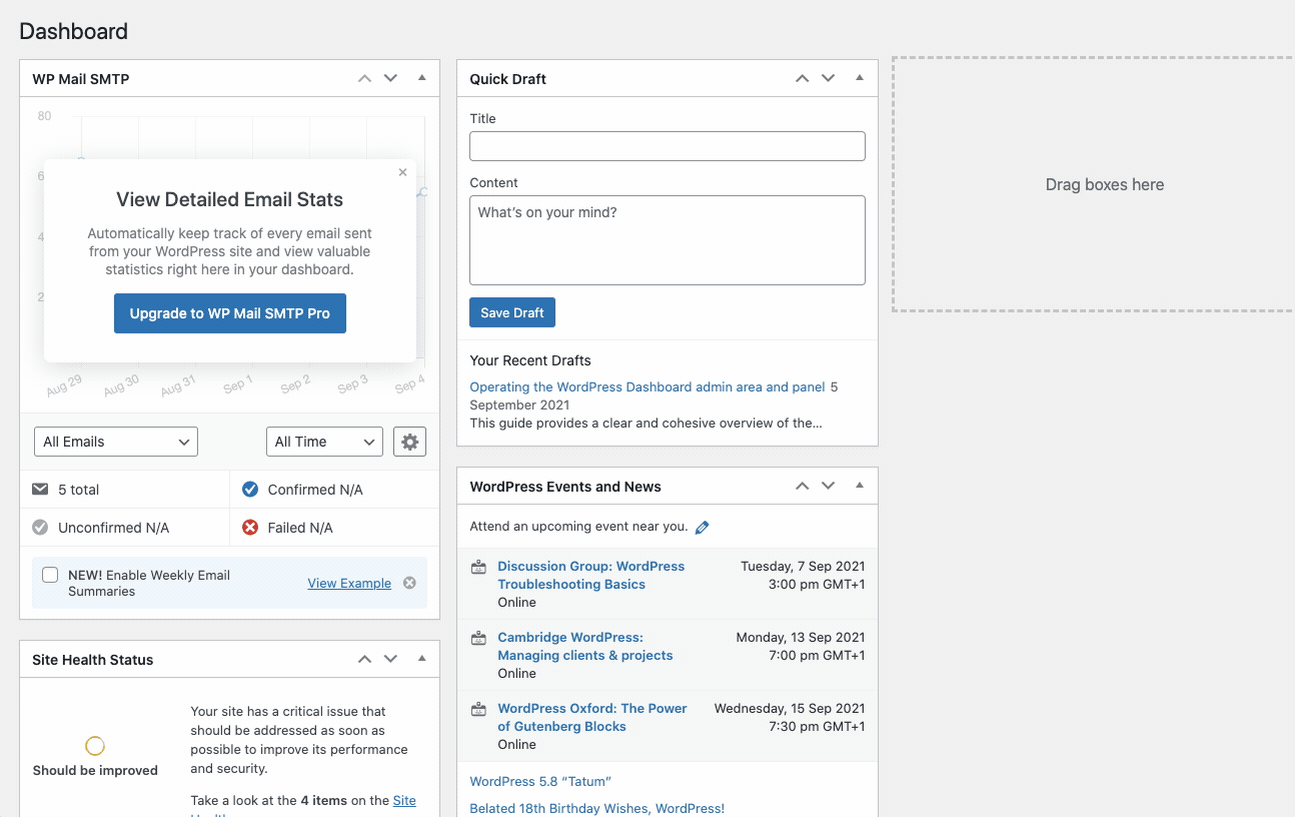
WordPress News and events
This one is pretty self-explanatory. Click on this widget to access the latest news and events about WordPress. These include any new updates, alerts or conferences direct from the official WordPress site. It is good practice to routinely check this area.
Activity
The Activity component of the Dashboard displays your most recently published posts and any comments that have been submitted. It provides useful links to the different categories of comments at the bottom, so that you can view any that are pending, and gives you the option to approve, reply, edit, spam or trash them.
At A Glance
This is a snapshot of your entire operation. It details the total number of blogs, posts and comments on your website and also displays the version of WordPress that you are currently operating on, giving you the option to update to a newer version when one is available.
The Dashboard Menu
As mentioned earlier, the Dashboard menu, which is situated on the left of the screen, is where you can update and manage your site with the different options available. Here is a closer look at each of the categories.
Dashboard /Home
Perched right at the top of the menu column is the Dashboard’s ‘Home’ button, which is the first screen you are presented with once you have logged in. It is the place from which you can access all other areas of your website management.
Updates
Here, you can look for any available WordPress updates, plugins or themes. You can update them from within this section to ensure that your website is functioning at its full potential. Plugins and Themes can also be updated from their own sections, but the most up to date version of WordPress must be installed here.
Posts
Under this option, you can view all of your posts, create new ones or delete old ones that no longer serve your requirements. You can also edit existing posts and manage categories and tags. You can also read your posts’ readability and SEO scores in a snapshot.
Media
This is a really useful function that allows you to upload new images, documents and files to your site. Once uploaded, you can access your media file library from this section in order to view, edit or update them.
Pages
This menu option is the place to visit in order to view all of the pages on your website. From here you can create new pages, edit existing ones or completely delete them. Similar to posts, you can view readability and SEO scores and see publishing dates and authors on one page.
Appearance
This menu option is the main one to use for customising your website as it helps determines how your site is navigated by users. You can re-order your main pages as they appear on your site and create drop-down menus. You can also change or edit a theme using the Theme Editor, alter Headers, change the background image and manage any widgets.
Plugins
Plugins are additional components that you can install to carry out a range of useful tasks such as Content Analysis, Anti-Spam and Social Media/Share icons. Their use enhances the overall functionality of your website. You can both add, edit and delete plugins under this section or, alternatively, activate/deactivate them. Make sure you update your plugins when are alerted as this will improve the performance and security of your site. Here is a guide on how to update your WordPress plugins.
Comments
Here you can access, view and manage all of the comments on your website. It shows you the latest comments on your blogs or articles and allows you to approve, mark, edit, reply or ‘trash’ them.
Users
This option allows you to view, add, edit or delete existing users of your site. You can manage user roles based on the level of responsibility you want them to have using the admin panel.
Tools
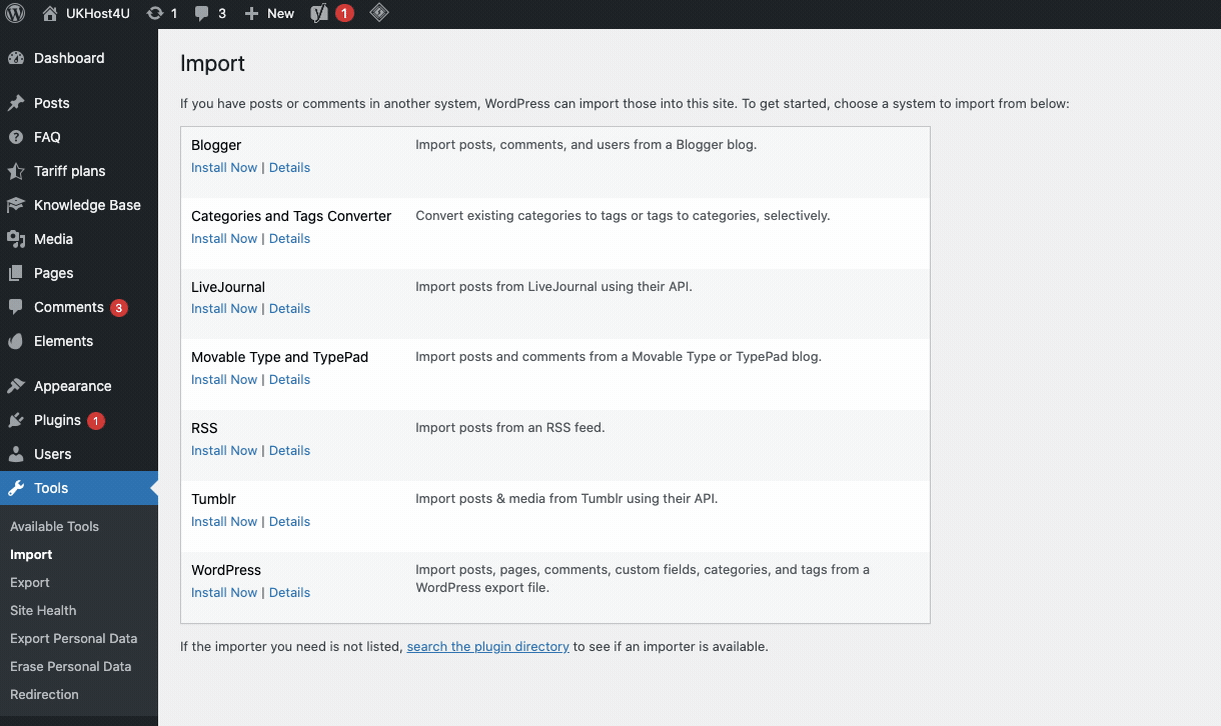
Under ‘Tools’ you will find the means to import data or other information from different platforms, such as Tumblr, Reddit or LiveJournal. It also gives you the ability to export the data from your own website. Personal data from your site can be erased or exported from here too. There is a quick link here to the Site Health section to keep on top of your website, review its security and optimise its performance.
Settings
This is a very comprehensive element of the admin panel, with a large range of features which allow you to edit various aspects of your website, such as the title of your site, default settings for users, selecting which page your new posts should appear on, manage comments
Collapse menu
Right at the very bottom of the menu is an option labelled ‘Collapse menu’. If you select this function, the names of the menu items will be hidden from view and represented by their respective icons. In order to re-display the item names, simply click on it again.
Personalising your dashboard
Changing the colour scheme
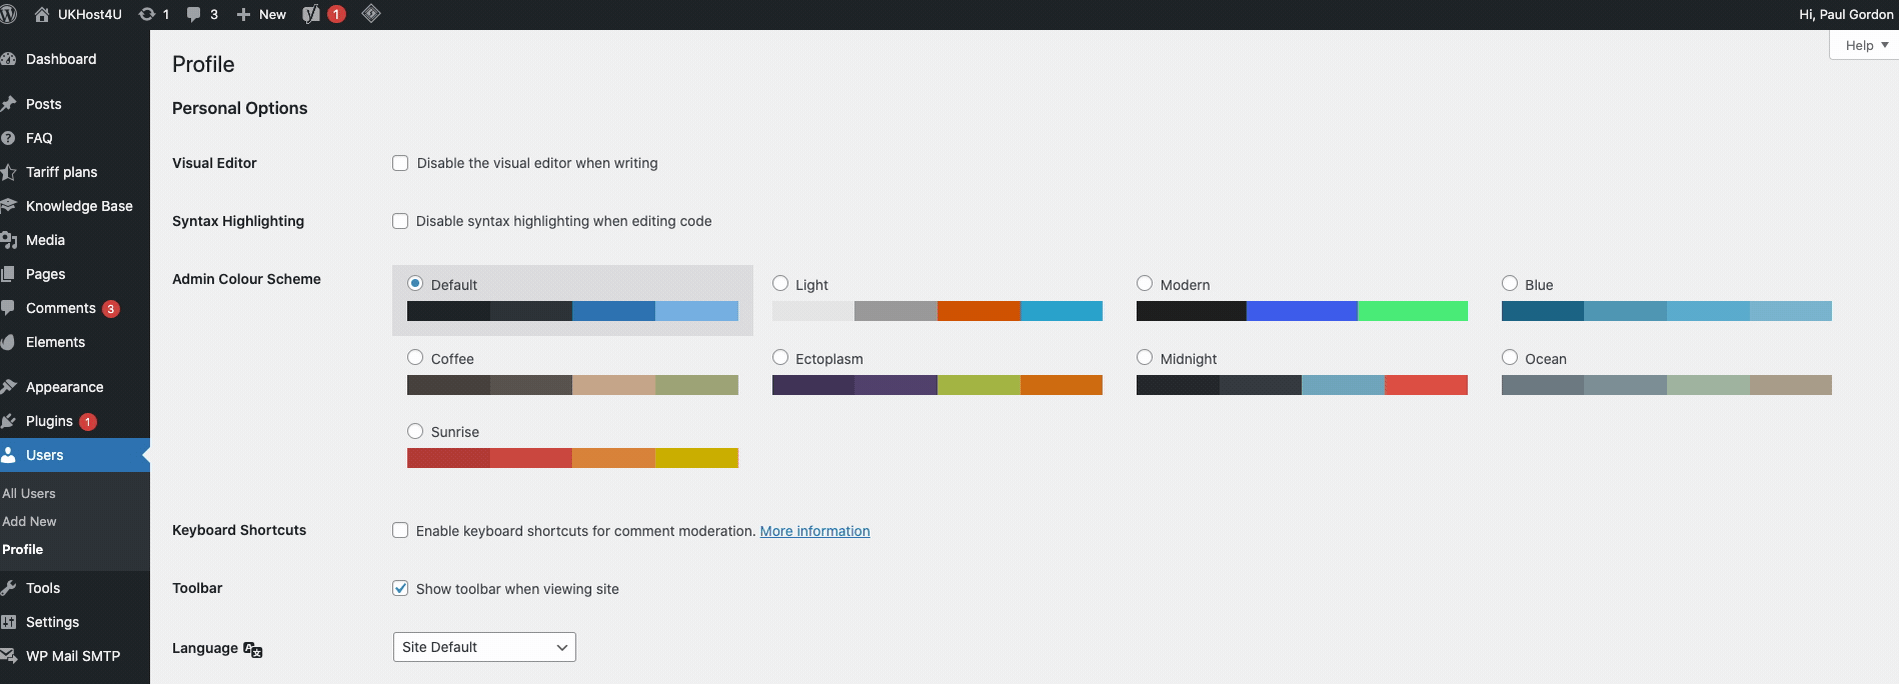
If you’d like to keep company branding consistent or simply want to change the colour of your WordPress Dashboard, you can. To do this, position your cursor over the username, which is located in the top right-hand corner of your admin panel. A dropdown menu containing the option to ‘Edit Profile’ will appear. Click on this option and you will be transported to a new ‘Profile’ page. On this, you will be presented with an option entitled, ‘Admin Colour Scheme’. If you click on this you will be able to choose from one of the eight different colour schemes available and make your Dashboard more aesthetically attractive. Scroll down and click ‘update profile ‘at the bottom to confirm changes.
Hiding widgets
As mentioned earlier, tailoring your admin panel to your individual needs can be achieved by using the Screen Options facility at the top right-hand side of the Dashboard, hiding any of the widgets you use less frequently from view by removing the check the box next to the name of the relevant widget.
Summary
This guide has provided a basic overview of the layout and functions of the WordPress Dashboard, with a step-by-step explanation of how to locate and login in to your admin panel. The description of the main elements of the home screen, different categories featured in the Dashboard menu and how to personalise the panel to your own requirements will help you navigate your admin panel effectively.
The user-friendly nature of WordPress allows you to freely explore all of the functions available, and there is additional information accessible via a ‘Help’ button which you will find to the right of the ‘Screen Options’ button at the top of the admin panel. Please see here for our manage WordPress Hosting.
Please leave a comment below if you have any further questions about the dashboard or its functions.
About Paul Gordon