Cloud Solutions Starting Guide

Dashboard Guide
The following guide will provide you with the necessary information on the dashboard usage, and will help you to get acquainted with the offered possibilities.
To start with, you can check out the quick overview video below to get insights on the main functionality, available through the intuitive UKHost4u dashboard:
Don’t forget to sign up and start your 14 day Free Trial to get acquainted with the platform. Our support team is available 24/7 to answer all your queries.
Here below a short outline to help you navigate across this guide:
- Create and Manage Environments
- Function Icons for Environments
- Environment Settings
- Icons Functions for Each Instance
- Import
- Marketplace
- Environment Groups
- Dashboard Search
- Deployment Manager
- Tasks Panel
- User Settings
- Free Trial Account & Balance
- Help and Account Options
1. Create and Manage Environments
1. To start a new environment, simply click on the “New Environment” buttons.
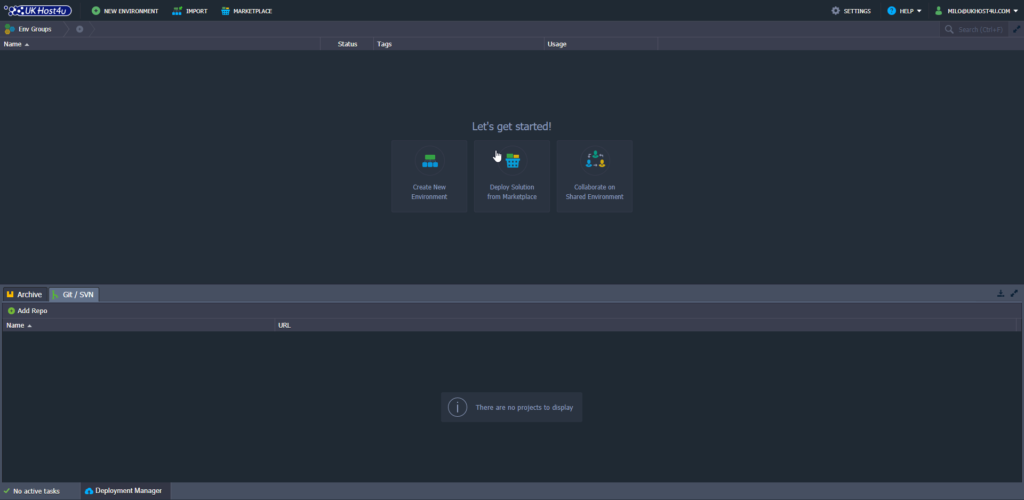
You can find them in the upper left corner of the dashboard or at the center if you haven’t started any environments yet.

2. It opens the your environment settings. The Topology Wizard allows you to completely customise your environments and at anytime.
You can select the languages such as Java, PHP, Python, etc, and scale accordingly each and every component, deploy load-balancers, select the amount of storage needed and even install an SSL certificate.
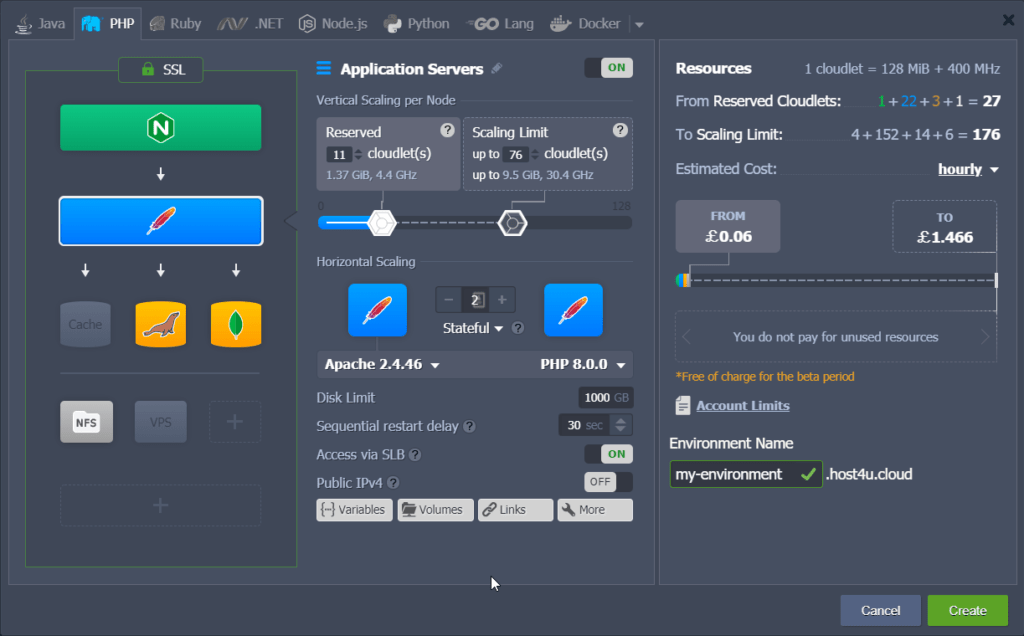
First, enter the name of your environment and click “Create” once you’re done.
PLEASE NOTE: the environment creation might takes several minutes. You can check the installation progress and status on the bottom right corner of the dashboard.
3. Once created, all of your environments will be listed in the central panel of the dashboard.
You will see the following columns:
- Name: name of your environment or alias. Using the triangle icon before the environment’s name, you can expand the list of nodes it includes.
- Status: it shows the current status of the environment such as: Running, Sleeping, Stopped, Creating, Launching, Stopping, Cloning, Redeploying, Exporting, Installing, Migrating, Deleting.
- Tags: displays the group this environment belongs to or name of the project.
- Usage: it shows the current load such as cloudlets and disk space usage.
Find our complete guide on how to create your cloud environment here.
2. Function Icons for Environments
If you hover over a running environment, you will see multiple icons to help manage it: Set Alias, Region, Open in Browser, Settings, Change Environment Topology, Clone Environment, Start/Stop, Delete Environment, Add/Edit Env Groups.
![]() is the Set Alias icon. It provides an alternative environment name (domain will remain unchanged).
is the Set Alias icon. It provides an alternative environment name (domain will remain unchanged).
NOTE: hovering over the environment instantly display its region (if multiple ones are available).
![]() is the Open in Browser icon. It allows you to open the environment in a new browser tab.
is the Open in Browser icon. It allows you to open the environment in a new browser tab.
NOTE: This option could be absent in case your environment does not include an application server and load balancers.
![]() is the icon for your environment Settings. It opens a separate tab with numerous configuration panels.
is the icon for your environment Settings. It opens a separate tab with numerous configuration panels.
![]() if you need to Change the Environment Topology. Simply perform the required changes and click Apply.
if you need to Change the Environment Topology. Simply perform the required changes and click Apply.
![]() can be used to Clone your Environment. In the opened frame, specify a name for the new environment and click Clone.
can be used to Clone your Environment. In the opened frame, specify a name for the new environment and click Clone.
![]() Start and Stop
Start and Stop ![]() buttons change the status of the environment.
buttons change the status of the environment.
NOTE: When the environment is stopped, only the Settings, Clone Environment, Start, and Delete Environment buttons are available.
![]() use this icon to Delete an Environment. Simply click on the following and confirm the action by entering your password.
use this icon to Delete an Environment. Simply click on the following and confirm the action by entering your password.
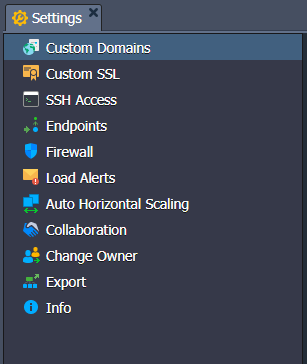
3. Environment Settings
Within the environment Settings tab, you can chose between eleven options such as:
– Custom Domains,
– Custom SSL,
– SSH Access,
– Endpoints,
– Firewall,
– Load Alerts,
– Auto Horizontal Scaling,
– Collaboration,
– Change Owner,
– Export,
– Info.
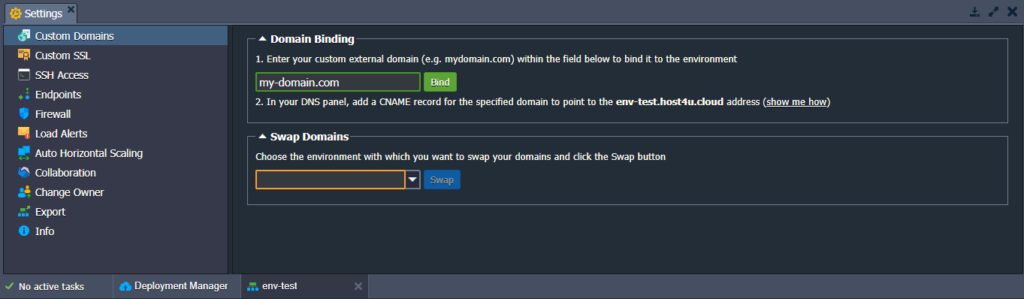
1. Select Custom Domains to access the following sub-options: Domain Binding and Swap Domains.
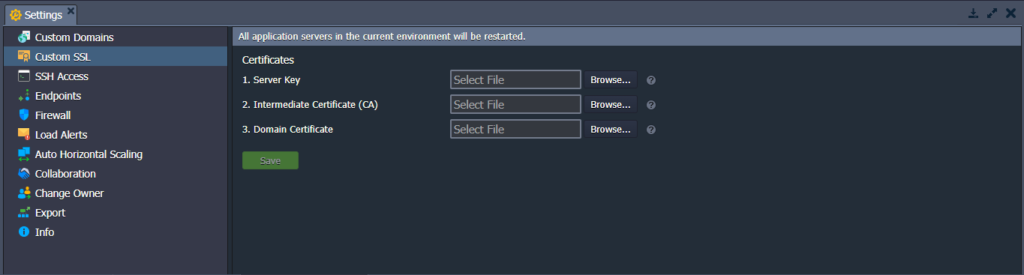
2. Choose the Custom SSL option and upload the necessary files to apply your custom SSL certificate.
Note: This feature can be configured only for the certified application servers and load balancers with public IP addresses attached.
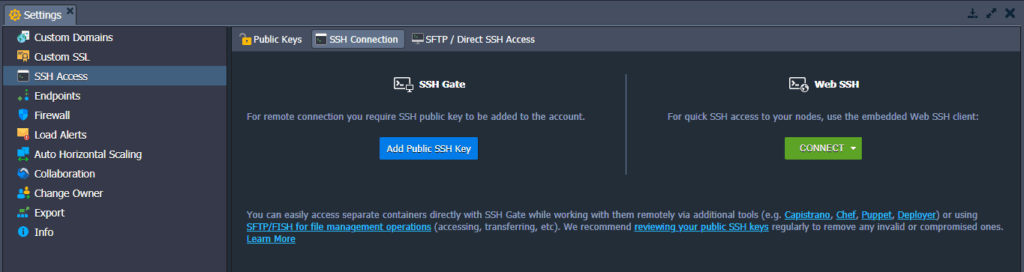
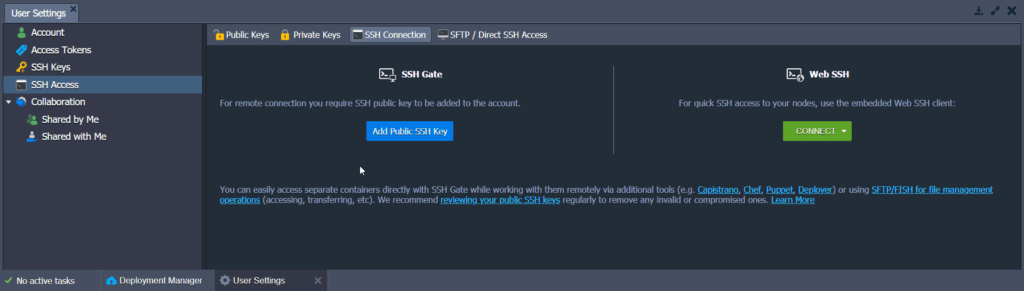
3. In the SSH Access section, you can see the Public Keys, SSH Connection, and SFTP / Direct SSH Access tabs. The first one allows you to manage your public SSH keys. The second one shows how to access your environment (either via SSH Gate or Web SSH). The third provides details on the connection over the SFTP/FISH protocols.
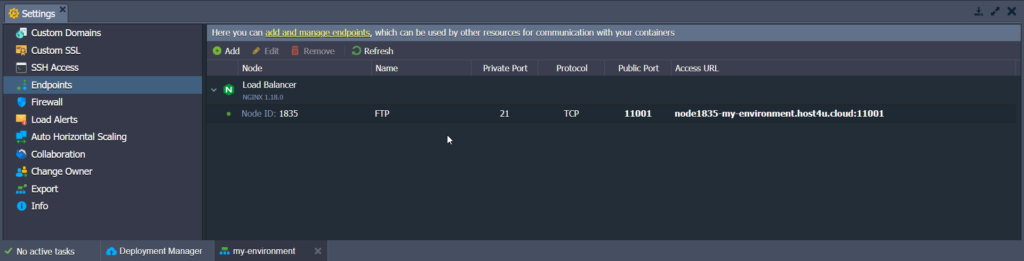
4. Within the Endpoints section, you can manage the mapping of your containers TCP/UDP ports, for ensuring their collaboration with external resources via a direct connection.
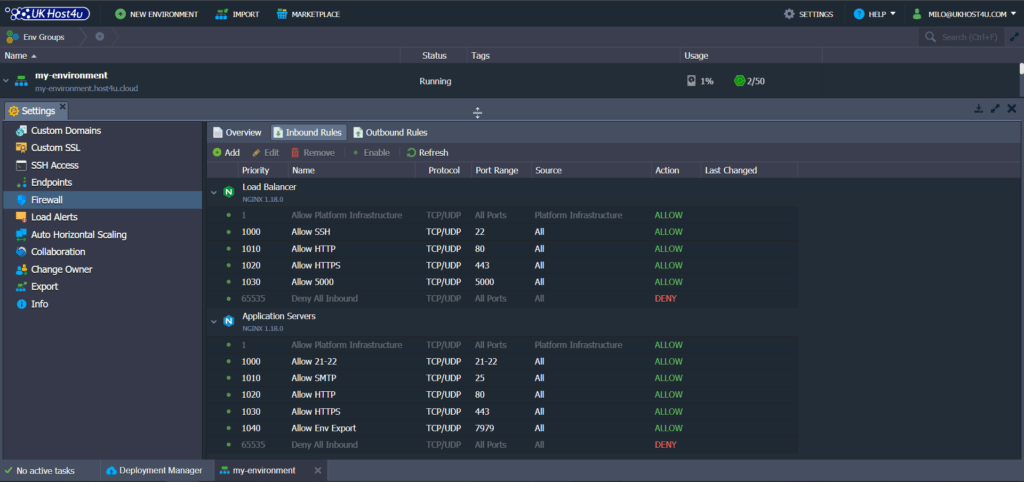
5. The Firewall section allows setting Inbound and Outbound Rules to manage access to your containers.
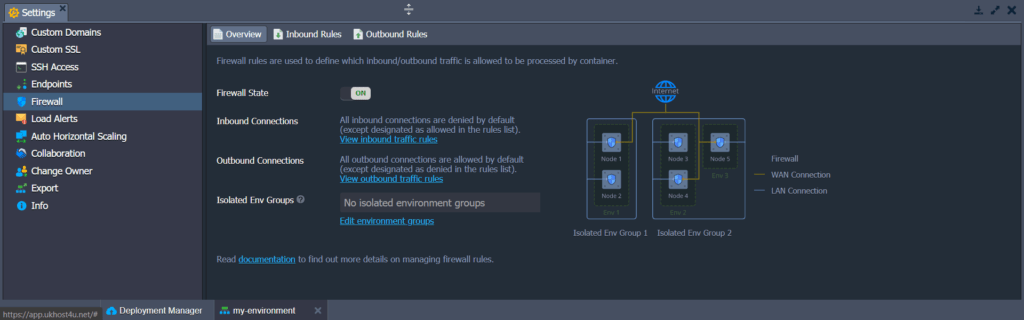
These rules allow to explicitly define which connections should be accepted and which ones should be blocked.
6. Use Load Alerts for setting new triggers (or adjusting the default ones), to receive the appropriate email notifications when the specified resource’s usage exceeds the stated limits.

7. Within the Auto Horizontal Scaling option, you can configure triggers to control the number of containers within the layers (except the Maven build node). Scaling conditioning is defined based on the CPU, Memory, Network, Disk I/O, and Disk IOPS consumption.
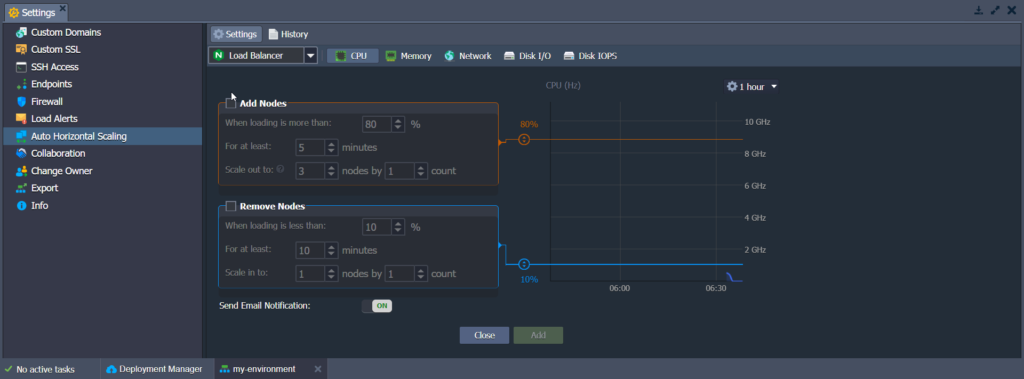
The Events History section contains records about all the events that occurred due to the triggers configured in the subsections mentioned above.
8. In the Collaboration section, you can view and manage the list of accounts, which have access to the current environment.
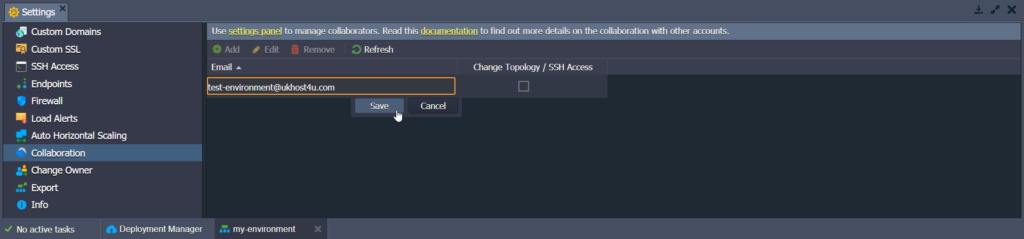
In case you need to grant access to another user, click Add and fill in the Email field. You can also tick Change Topology / SSH Access if you would like to give such permissions. Click Save.
9. Click Change Owner to transfer an environment to another user account within the confines of a single platform.

10. Select Export to pack all your environment’s settings and data into a single downloadable file. Subsequently, it can be restored at another hosting provider’s platform, creating an identical environment copy.

Note: Currently, Windows nodes, Storage, Elastic VPS, Maven, and Docker containers are exported without any data inside. In these cases, you’ll need to transfer the required files and configurations manually.
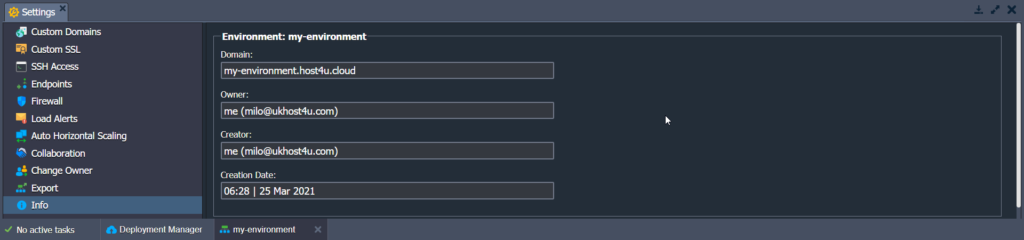
11. Switch to the Info section to see additional information on the environment Domain, its Owner and Creator (can differ due to the account collaboration feature), Region, the Creation Date.
That’s all of the environment settings.
4. Icon Functions for Each Instance
Click on the arrow icon next to the your environment’s name to check the list of node groups: load balancers, application servers, databases, Build Node, etc.
Then expand these layers to view each separate containers and deployed contexts within.
PLEASE NOTE: each node is supplemented with a list of attached IP addresses (internal and external IPv4/IPv6 ones).
Now, if you hover over a particular layer or container, you will see icons popping up which all have different functions. For example on the screenshot below you can see 9 icons that appears for the “Load Balancer” container.
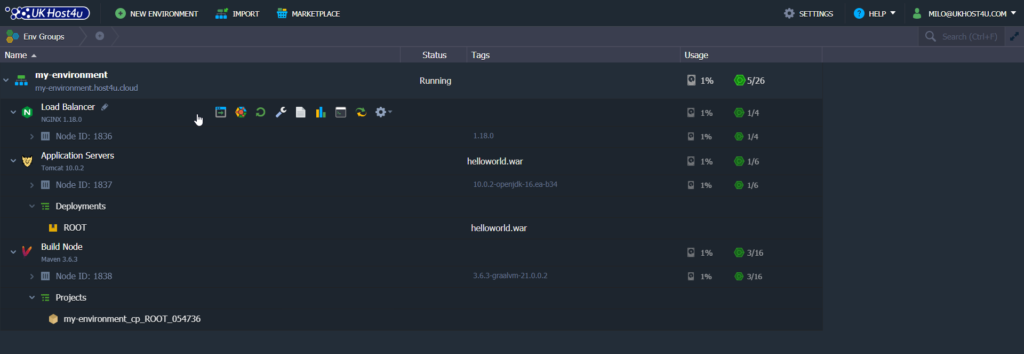
You can use these icons to perform the following actions:
- Set Alias: by double-clicking on the layer’s name or the pencil icon that appears when you hover over the container’s name. You can set an alternative name for your layer/nodes for example to define master and slave servers in a DB cluster.
- Open in Browser: you can access a node of the layer in a new browser tab.
- Restart Node(s): to restart the appropriate service inside a particular container or within the whole layer.
- Config: to open the configuration file manager tab. You can adjust there your node settings by modifying/removing existing and creating/uploading new files.
- Log: to view the log files for the nodes of the layer. The list of log files may vary based on the selected instance.
- Statistics: to track CPU, RAM, Network, Disk space, and IOPS consumption data for a separate node or a set of nodes in real-time.
- Web SSH: to connect to your container over SSH protocol directly in the browser.
- Redeploy Container(s): to update nodes to the preferred tag.
- Add-Ons: to install available pluggable modules.
- Remote Desktop: to manage Windows-based nodes.
- Additionally: corresponds to configure container settings such as Variables, Links, Volumes, CMD / Entry Point and view SFTP / Direct SSH Access details.
Also, depending on the node, it can contain other options like Reset Password or Admin Panel Login.
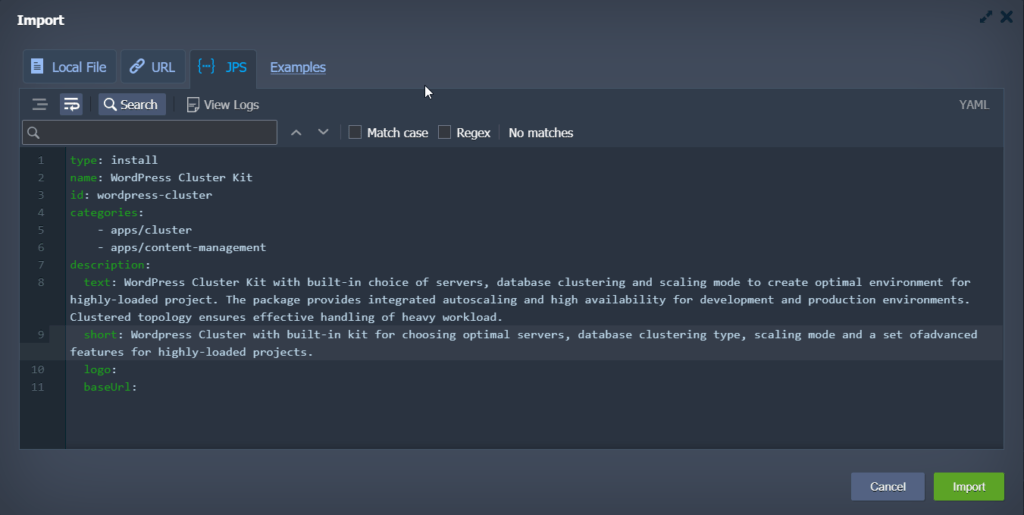
5. Import
If you look on the top left of your dashboard you will find the Import button.

You can upload .json, .jps, .cs, .yml, or .yaml files to create a new environment (or modify the already existing one with an add-on for example) according to the settings.
PLEASE NOTE: you can use this feature to create a copy of the environment from another installation by exporting it on one platform and importing onto the other.
Within the opened Import frame, you’ll see 4 tabs:
- Local File: using the browse button, select the locally stored file you wan to upload and execute on the platform.
- URL: provides a direct link to the required manifest file.
- JPS: the in-built JSON/YAML editor can be used to insert and edit your code before the deployment.
- Examples: link to the JPS Collection with numerous ready-to-go solutions.
6. Marketplace
Further on the left now, you can navigate to the “Marketplace” next to the Import button.
It will open the Marketplace where you can deploy pre-packaged applications such as CMS (WordPress, Magento, etc.), developer tools (Kubernetes, Jenkins, etc) and much more.
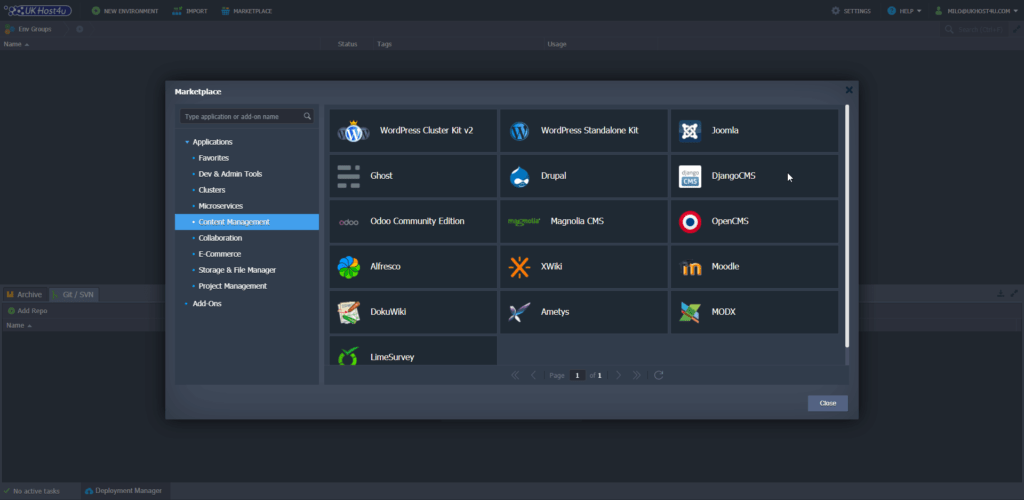
Chose the application you wish to deploy, click on the install button and simply fill in the installation information. That’s it!
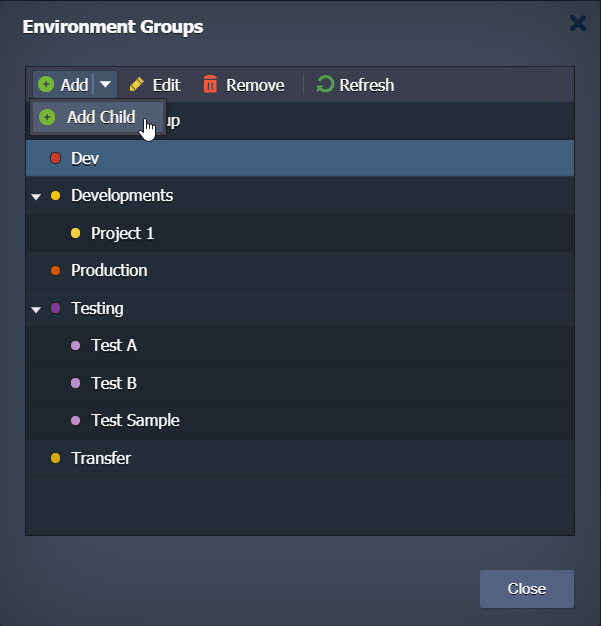
Furthermore, UKHost4u Cloud Solutions provides the possibility to create Environment Groups to help you organise and categorise your environments in a efficient way.
For example, when managing multiple projects, you will find very convenient to assign and categorise your environments per groups. And if you need to go even further, you can creating subgroups.
7. Dashboard Search
Our Cloud Solutions Platform provides also a built-in search option that you can access from the dashboard.
In the top-right corner (or Ctrl+F/Cmd+F), type your searched terms and hit Enter.
For example, you can locate a container by its IP/ID or search for the particular deployed project/environment.
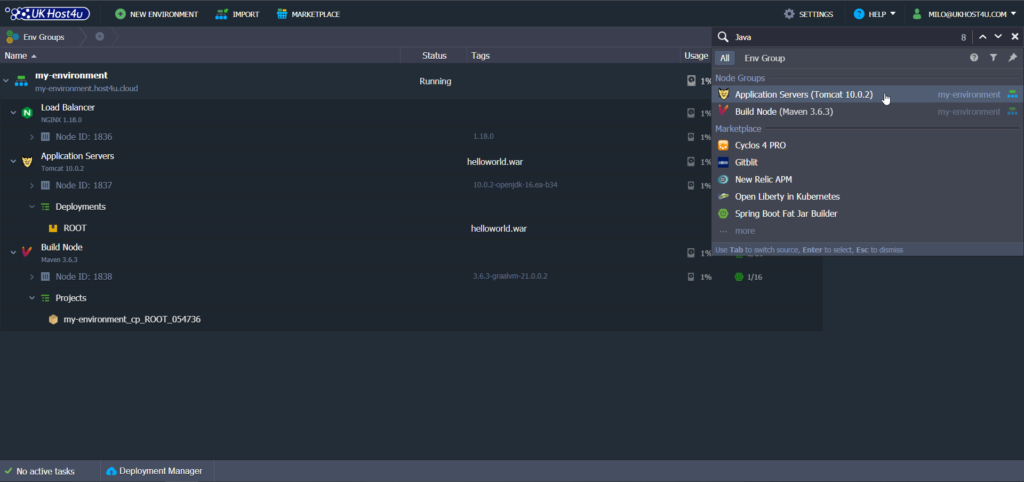
You’ll find the search engine to be highly customizable. In fact, it allows you to get the most accurate results for your search request.
Here are some search options available:
- special characters: such as “–” prefix to exclude a term or “*” wildcard.
- search source: either for the whole account or the current environment group.
- categories filter: to search among the selected entities: exclude the Marketplace packages or look for IPs only.
If you need additional details, click on the help button or simply contact our live chat for direct assistance.
8. Deployment Manager
The Deployment Manager is located at the bottom left of your screen.
In short, it stores applications to automate and ease their deployment into your environments.
You will find two options within the deployment tab:
- Archive: stores the application package itself. You can upload applications directly from your local machine.
- Git/SVN: saves the access credentials to your projects at the remote Git / SVN repositories.
Once a package has been added to the Deployment Manager, you will be able to deploy automatically in a selected environment.
PLEASE NOTE:
- For Java application servers the VCS deployment type is performed with the Maven build node.
- For the Windows-based IIS application server the .NET deployment process is different from the standardized flow.
You can find here additional resources on Deployment with UKHost4u Cloud Solutions Platform.
9. The Tasks Panel
The Tasks Panel is situated at the bottom of the dashboard. It contains live and historical data on the tasks that the platform is doing or has already done.
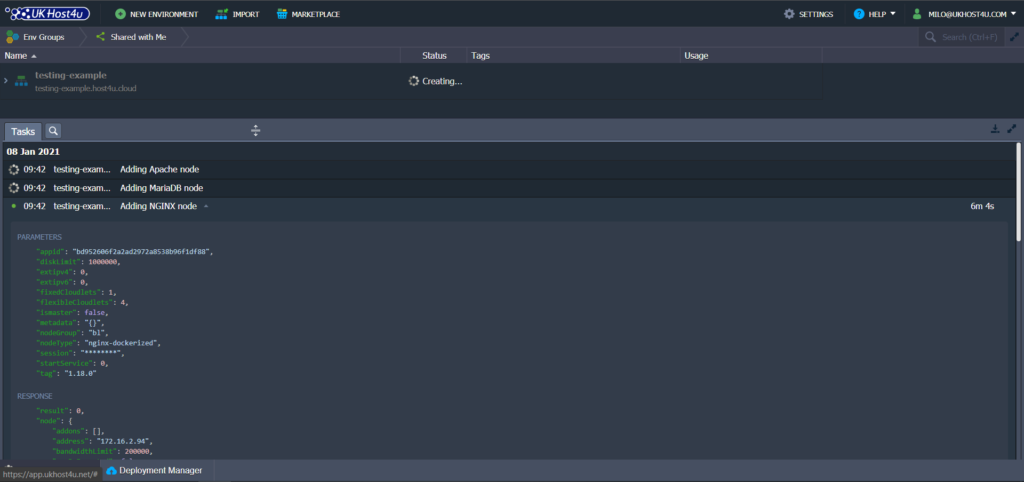
For each record you can find the following data:
- Status: shows the state of the operation, such as:
– Spinner: in progress.
– Green: success.
– Red: error.
PLEASE NOTE: If a collaborator works or has worked on the account, hover over the icon to view the email address of the corresponding account.

- Time: shows a starting time of the respective operation with the latest records displayed at the top of a tab note that all tasks are grouped by days.
- Environment: displays the name of the environment where the action was performed or “–” if there is no target environment.
- Task: provides an operation description and, in case of failure or error.
PLEASE NOTE: once completed, you can expand a specific task to view the action parameters and server response.

- Duration: shows an execution time of a task.
PLEASE NOTE: If you need to view the complete actions list done on your account, navigate to the Active Log tab using the magnifying glass icon.
To access our advanced search and filter options and locate easily the required tasks, simply use:
- Search: performed by the parameters and server response.
- Date range: and select between last 1/6/24 hour(s), current/previous week, current month, or provide your custom period.
- Errors only: tick to hide all the successfully executed operations and display only errors.
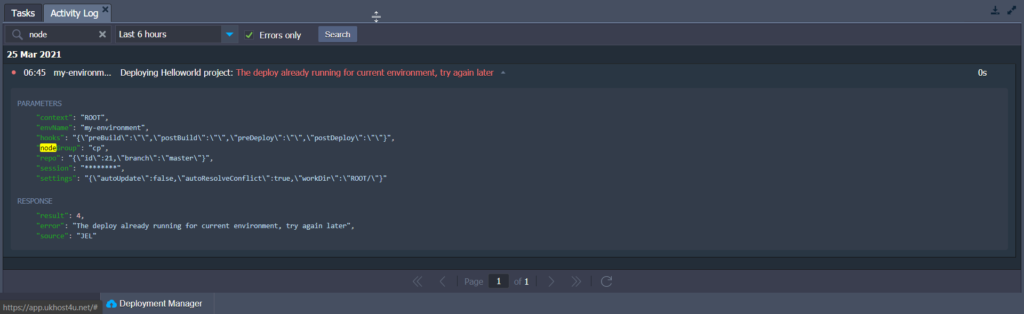
Using the Tasks panel, you can always track any activity on your account and troubleshoot any issues.
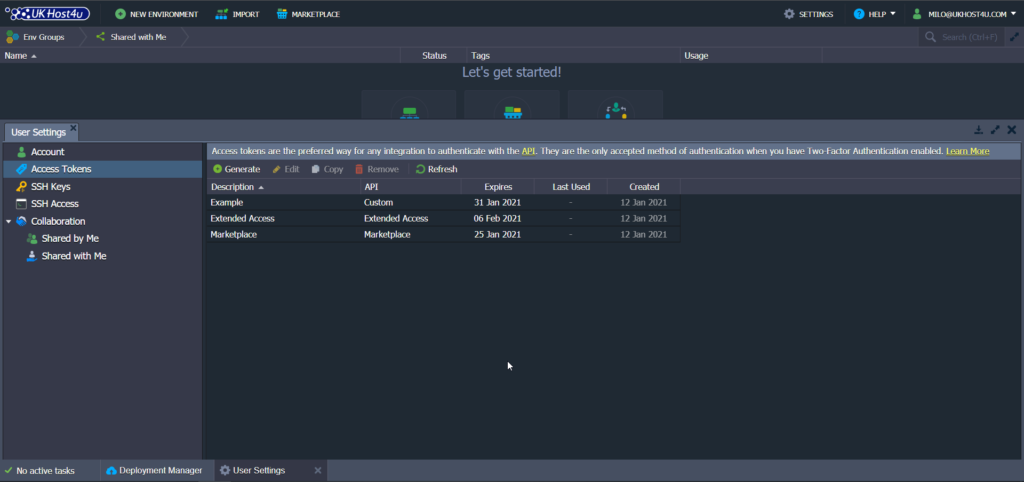
10. User Settings
To access your user’s settings, simply click on the Settings button at the top-right corner of your screen to access all your User Settings configurations.

Here, you can find the following sections:
– Account,
– Access Tokens,
– SSH Keys,
– Collaboration.
1. In the Account section you can manage the two-factor authentication for your account, as well as change your password.

2. In the Access Tokens tab, you can configure personal access tokens for your account.
3. The SSH Keys / SSH Access points open the same section with four tabs:
- Public Keys: stores public keys added to the platform. Note: Public Keys are required for remote access via local SSH client.
- Private Keys: lists private keys added to the platform. Note: Private keys are required for access to your private Git repository over SSH.
- SSH Connection: shows the required steps to connect to your account via SSH Gate. It allows accessing particular nodes directly in the browser using Web SSH.
- SFTP / Direct SSH Access: displays connection data for SFTP/FISH protocols.
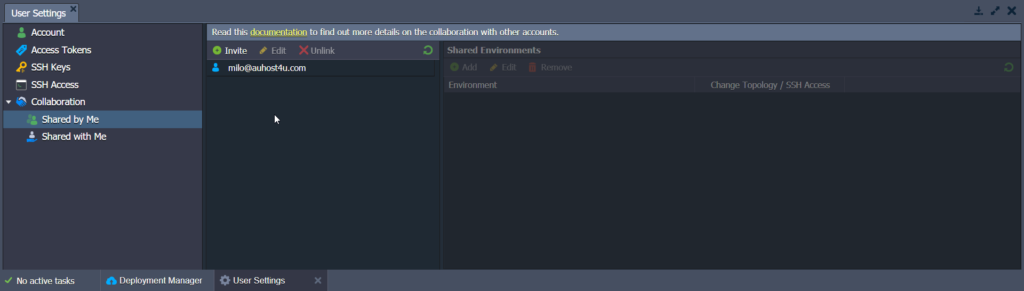
4. The Collaboration option includes two items.
– Shared by Me: allows managing users that you’ve shared environments with.
– Shared with Me: shows the collaborations that include your account.
11. Free Trial Account & Balance
If you haven’t registered your 14 day free trial, check our article here: How to Register my Free UKHost4u Cloud Solutions Account?
Now, depending on the account type (free or billing) you will find either the Refill Balance or Balance sections at the top of the dashboard panel are displayed.
1. The default type of all accounts is trial, which provides a free of charge hosting period with some restrictions on the amount of provided resources.
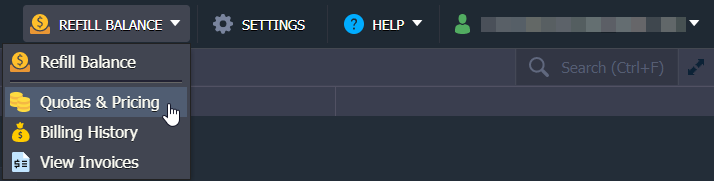
Expand the Refill Balance drop-down menu to see the following options:
- Quotas & Pricing: to learn about your free trial limitations and resources restrictions.
- Billing History: shows account spends for the specified period and see all the statistics on recent resource usage for your account.
- View Invoices: option to go to the external billing system panel with the account invoices, orders, payments, etc.
2. Billing accounts are spared from any limitations but are charged according to the hosting provider’s pricing.
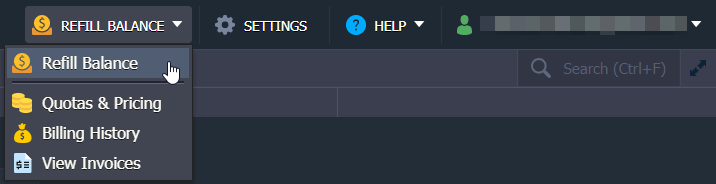
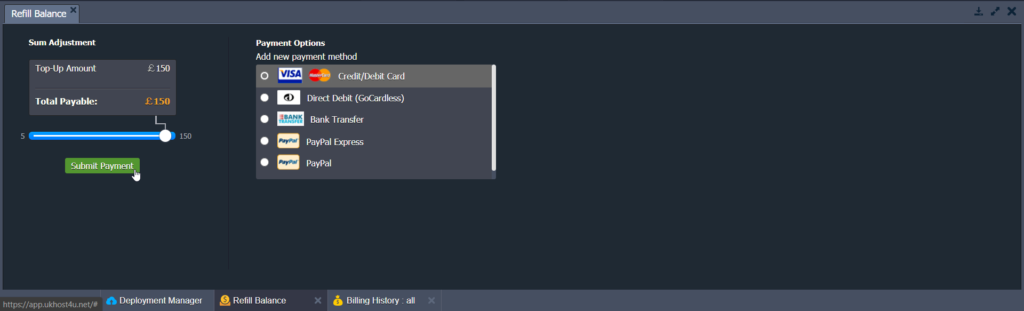
Click the Refill Balance button to expand a list of the following options:
- Balance: shows the current balance of the account. By clicking on the section, you can open the Refill Balance tab.
- Refresh Balance: option updates balance data to the most actual value.
- Refill Balance: to submit the payment.
- Payment Methods: option gives an opportunity to choose the default payment method for the account or add a new one.
13. Help and Account Options
The last two sections of the dashboard are Help and Account (email address).
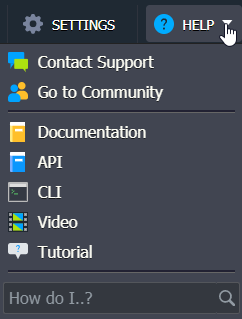
1. The Help drop-down menu provides access to multiple useful links:
- Contact Support: redirects to the platform customers support page (sometimes available for billing users only).
- Go to Community: is a link to the online community at Stackoverflow.
- Documentation: navigates to the UKHost4u Devs Documentation.
- API: is a hyperlink to the UKHost4u API Documentation.
- CLI: redirects to the Command-Line Interface Overview.
- Video: points to the UKHost4u YouTube Channel.
- Tutorial: starts a short, interactive guide, which explains the basics of working with the platform.
- How do I..?: shows a list of documents relevant to your request.
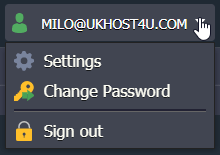
2. Within the Account (email address) drop-down list, the following options are available:
- Settings: redirects you to the User Settings section.
- Change Password: opens the same-named dialog box, where you need to fill in the required fields (Current Password, New Password, and Confirm Password).
- Sign out: to log out of the current account.
To Conclude
Now that you know all of the basic dashboard functionalities it’s time to get you started. Simply sign up your FREE Account here. Test it for free during 14 days and see for yourself.
Of course, if you have any additional questions, please contact our super friendly support team available 24/7.
About Milo Travers